Creating a Bootable USB Drive Installation for Windows 11
In this tutorial we will be going over how to create a bootable USB Drive with and for a Windows 11 installation. This assumes, that you already have the Windows 11.iso file, which you can get from the official Microsoft page.
Preparing the USB Drive
First of all, we will need to prepare our USB Drive, keep in mind that it will be formatted in the following steps.
Insert your USB Drive in your computer. Then, we will have to open the command prompt: Press the windows key, and search for ‘cmd’, right click on it and open as administrator.
In the command line type diskpart.
Then type list disk.
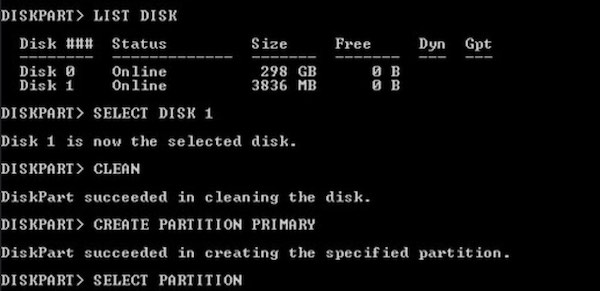
This is an important step, as you have to identify your USB Drive (based on the volume/free space). Most likely it will be either Disk 1 or Disk 2. For the sake of this tutorial we will assume Disk 1, but if it is something else make sure to substitute that.
In the command prompt type the following commands, each followed by Enter/Return:
SELECT DISK 1

CLEAN

CREATE PARTITION PRIMARY

SELECT PARTITION 1

ACTIVE

FORMAT FS=NTFS quick

ASSIGN

EXIT

Windows Diskpart in action
After this, don’t close your command prompt yet! We will still need it.
Copying the Installation
Now insert your Windows 11 installation DVD. However, if you have an .iso file (which is basically a virtual DVD), you will need to use a Mounting Tool for Virtual DVD’s. I use usually Daemon Tools Lite (it’s free) - but please watch out during installation, as it also wants to install a lot of junkware on your system (skip all of that).
Head into ‘My Computer’ and note the letters of the USB Drive and the (virtual) Microsoft Windows 11 DVD. Here we will assume that that the USB Drive letter is ‘H’ and the DVD Drive letter is ‘D’. Make sure to substitute the correct drive letters!
Type the following commands in the command prompt, each followed by Enter/Return:
D: CD BOOT

CD BOOT

BOOTSECT.EXE /NT60 H:
Again, subsitute ‘D:’ for your ISO/DVD Drive letter and ‘H:’ for your USB Drive letter.
As the last step you have to copy the contents of the (virtual) DVD Drive onto your USB. Head into ‘My Computer’, right click your DVD Drive and select ‘open’.
Copy all the contents and paste them on your USB Stick. This might take a while.
Starting the Installation
After that we are done! Head into your BIOS select your USB Drive as the startup media, and you have a Windows 11 installation/recovery drive!
See the next post for how to install Windows 11 fresh on unsupported hardware.